Use the Modified Date block to display the publication date of a post or page. You can add this block directly to a page template in the Site Editor, such as the Single Post or Page template, to ensure a consistent layout across your site. You can also add it inside a Query Loop block to customize the appearance and layout of your post feeds.
If a post has never been modified after publishing, the Modified Date will be blank on the front end published page.

Add a Modified Date block
To add the Modified Date block, click the + Block Inserter button in the top-left corner of the editor. Search for the Image block and click on the block to add it to the page.

You can also quickly add the Modified Date block by typing /modified date and pressing Enter.
Detailed instructions on adding blocks.
Add to a template
The Modified Date block can be added to a template in the Site Editor to easily reflect the published date of a page or post across your website.
Block toolbar

To view the block toolbar, click on the block and the toolbar will be displayed.
Transform
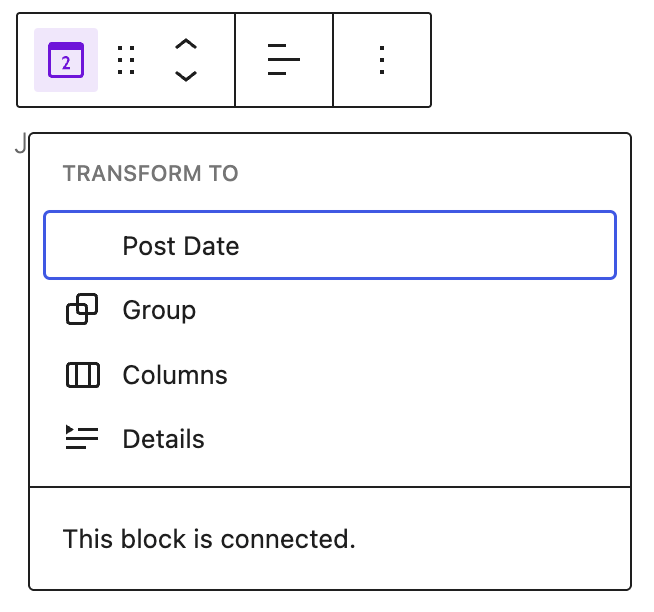
Click on the Transform button to convert the Modified Date block into a Post Date, Group, Columns or Details block.
You will also see a “This block is connected” message indicating that the block has a binding to the Post’s published date.
Block moving tools

The block-moving tools allow you to move the block in the editor. Use the six dots icon to drag and drop the block and place it anywhere on the page. Alternatively, click on the up and down arrows to move the block up or down.
Get more information about moving a block within the editor.
Change text alignment

Click the Change alignment button in the Block toolbar to display the alignment drop-down. You can align the block text to the left, make it center-aligned or align it to the right.
More options
The More options menu represented by three vertical dots on the far right of the toolbar gives you more features such as the ability to duplicate or remove the block.
Read about these and other settings.
Block settings

Every block has specific options in the editor sidebar in addition to the options found in the block toolbar. If you do not see the sidebar, click on the Settings button next to the Save/Publish button.
Transform to variation button
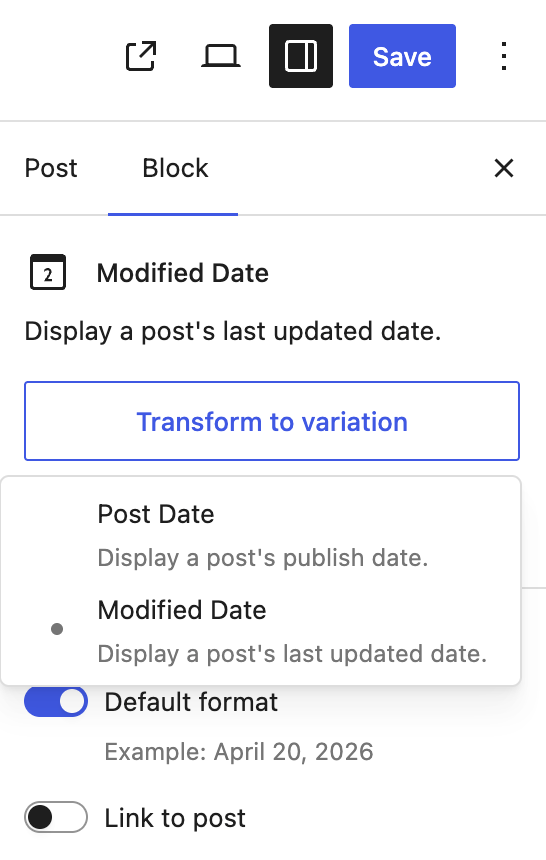
The Modified Date block can be easily transformed into a Post Date block either by choosing the Transform button on the block toolbar or the Transform to variation button from the block settings.
The Image block settings panel is divided into two tabs – Settings, and Styles.
Settings

Default format
This option is toggled on when you first add a Modified Date block. Your site’s Default format can be changed in the site settings area, see customize default date and time format to learn how.
To change the Modified Date block to use a different format from your site’s default format, toggle off the Default format settings.
You can choose a format from a list of predefined selections under Choose a format.

Or you can choose Custom from the drop down and enter a new format string in the input box that appears.

Link to Post
Toggle on the Link to post option to link the modified date to the URL of the post. In a Query Loop block, this enables the website visitor to go to the post by clicking on the Modified Date.
Advanced
The following Advanced settings options are available: HTML Anchor, Additional CSS Class(es), Additional CSS, and Styles.
Learn more about advanced settings.
Styles
Color
The Modified Date block provides Color settings options to change the text and background colors.
See this guide for more information about changing colors.
Typography
The Modified Date block provides typography settings to change the font family, size, appearance, line height, letter case, letter spacing, and decoration.
Get more details about changing typography settings.
Dimensions
The Modified Date block block provides dimension settings options to change padding and margin size.
Learn more about dimension controls.
Border
The Modified Date block provides border settings options to add border color, width, and radius.
Learn more about border settings.
Changelog
- Updated 2026-07-08 (props to @awetz583)
- Updated screenshots and information for 7.0
- Updated 2026-06-29
- Linked to advanced settings
- Created 2023-08-08
Was this article helpful? How could it be improved?
Log in to submit feedback. If you need support with something that wasn't covered by this article, please post your question in the support forums.