Styling tables with CSS
-
Hi, I just started using this plugin and I really like it so far. Is it possible to style the table in this way?
- #1 Does anyone know how to create vertical lines at certain points of a table? (i.e. create a solid line border for some of the column borders)
- #2 Does anyone know how to set the background color of certain rows?
(see screenshot)
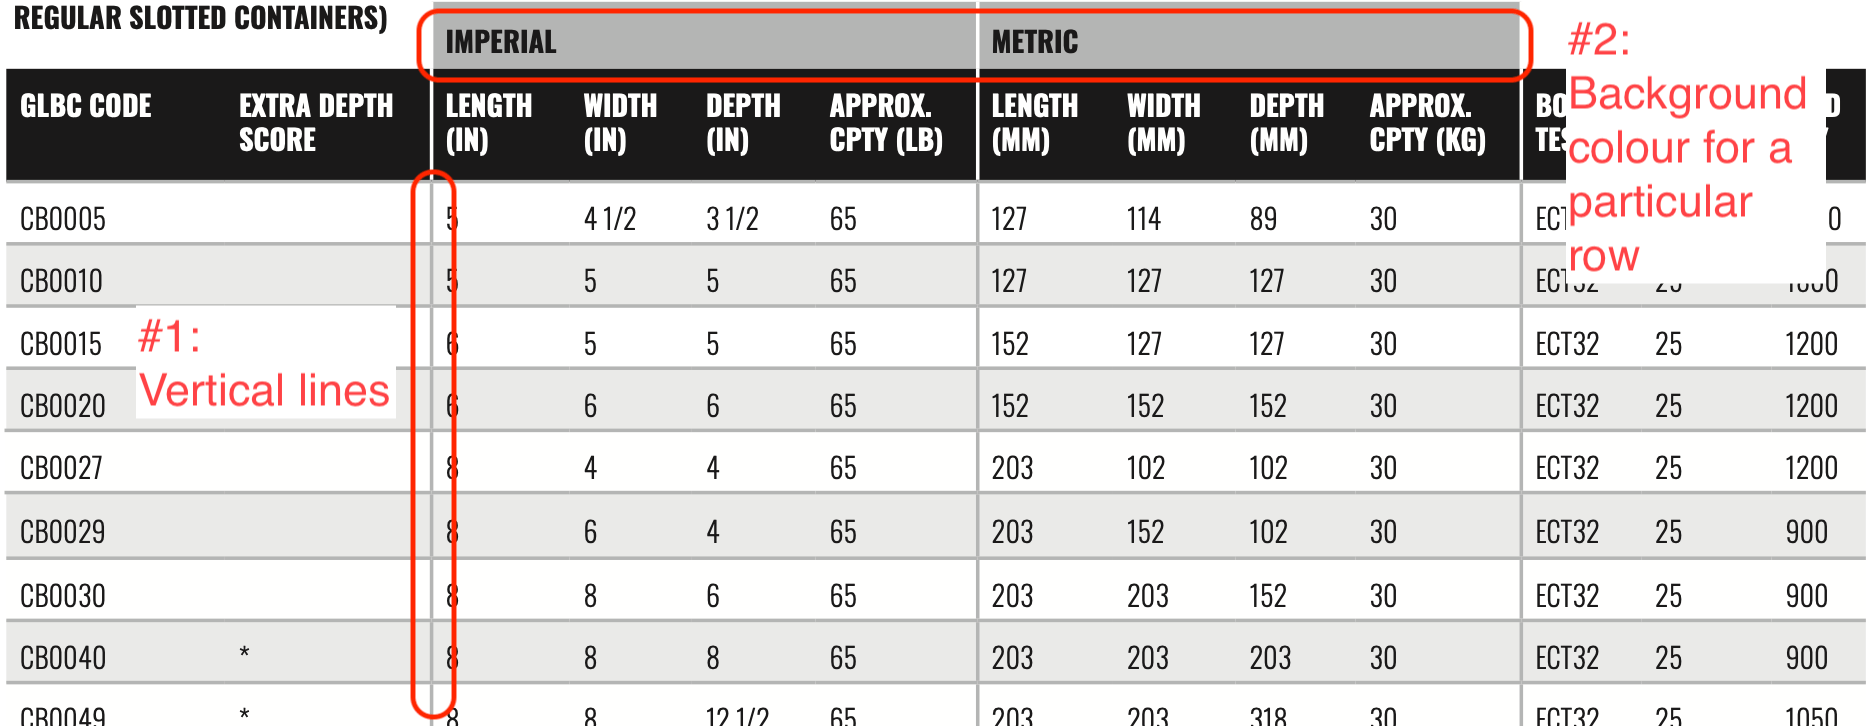
The page I need help with: [log in to see the link]

-
Hi there,
Thank you so much for the kind words! We are thrilled to hear that you are enjoying the plugin.
Yes, it is absolutely possible to style the table exactly the way you want using a little bit of custom CSS.
Below are the CSS snippets you need. Important Note: In the codes below, we have used1451as an example Table ID (.stwt-table-id-1451). Please replace1451with your actual Table ID so that the design applies to your specific table without affecting other tables on your site. You can easily find your Table ID inside the shortcode you generated (e.g.,[STWT_Sheet_Table id="1451"]).
#1. Create Vertical Lines (Column Borders)
To add a solid vertical line between your columns, you can use the following CSS. You can change#555B61to any color code you prefer.
css
/* Adds a vertical border to the right of each column */
.stwt-table-wrapper.stwt-table-id-1451 table.sheet-to-wp-table th,
.stwt-table-wrapper.stwt-table-id-1451 table.sheet-to-wp-table td {
border-right: 1px solid #555B61 !important;
}
#2. Set Background Color of Certain Rows
To highlight or change the background color of specific rows, you can use thenth-childCSS selector. For example, if you want to change the background color of the 6th row, use this code:
css
/* Changes the background color of the 6th row */
.stwt-table-wrapper.stwt-table-id-1451 table.sheet-to-wp-table tbody tr:nth-child(6) td {
background-color: #FF0000 !important;
}
(Tip: Simply change the number(6)to whichever row number you want to target. You can also duplicate this code to target multiple different rows!).
Bonus: Change the Table Header Background Color If you also want to apply a specific background color to the entire top header row, you can use this snippet:
css
/* Changes the background color of the Table Header */
.stwt-table-wrapper.stwt-table-id-1451 table.sheet-to-wp-table thead th {
background-color: #FF0000 !important;
}
Where to add this CSS? Simply log in to your WordPress dashboard, navigate to Appearance > Customize > Additional CSS, paste the codes there, and hit Publish.
Please give it a try and let us know if you need any further assistance. We are always here to help!
Best regards, Support TeamWOW! This is amazing and exactly what I was hoping for!! Thank you for the CSS snippets! Both of them worked great!
Further to #1, is it possible to only have solid vertical lines for some of the grid borders? For example, I only want the second, sixth, and tenth grid borders to appear (i.e. a border on the right side of the 2nd, 6th, and 10th columns)
https://www.glbc.com/products-services/corrugated-boxes/corrugated-boxes-stock/
Hi, I’ve actually changed the URL of the page. The new URL of the page is https://www.glbc.com/products-services/corrugated-boxes/stock-boxes/
Hi there,

We are so glad to hear that the previous snippets worked perfectly for you!

Yes, it is absolutely possible to add vertical borders to specific columns only. You can achieve this by targeting those specific columns (2nd, 6th, and 10th) using the :nth-child() CSS selector.

First, please remove the previous code you added for "#1 Create Vertical Lines" so that they don't conflict. Then, add this new code in its place:

css

/* Adds a vertical border ONLY to the right side of the 2nd, 6th, and 10th columns */

.stwt-table-wrapper.stwt-table-id-1451 table.sheet-to-wp-table th:nth-child(2),

.stwt-table-wrapper.stwt-table-id-1451 table.sheet-to-wp-table td:nth-child(2),

.stwt-table-wrapper.stwt-table-id-1451 table.sheet-to-wp-table th:nth-child(6),

.stwt-table-wrapper.stwt-table-id-1451 table.sheet-to-wp-table td:nth-child(6),

.stwt-table-wrapper.stwt-table-id-1451 table.sheet-to-wp-table th:nth-child(10),

.stwt-table-wrapper.stwt-table-id-1451 table.sheet-to-wp-table td:nth-child(10) {

   border-right: 1px solid #555B61 !important;

}

(Note: Just like before, please make sure to replace 1451 with your actual Table ID. You can also add more columns in the future by simply adding , .stwt-table-wrapper... th:nth-child(NUMBER) to the list).

Let us know if you need help with anything else!

Best regards,
Support TeamYou are amazing! This snippet worked PERFECTLY! Thank you so much!!!
Hi @bmnazmul, I’ve noticed that many of the rows in my Google Sheet are not appearing on my website.
Here is the Google Sheet with all the data (specifically the “RSC Style” tab): https://docs.google.com/spreadsheets/d/1IDMmaolW99V_yQQfDqUvBK9-lSAqqux1RHqmJ2gfgNo/edit?usp=sharing
When I look at the Live Preview of the table (in the back end of WordPress), all of the rows appear in the preview.
However, when I go to the live website, only 26 rows appear on the page: https://www.glbc.com/products-services/corrugated-boxes/stock-boxes/ (scroll down to the RSC table)
Is there a reason why only 26 rows are appearing? I checked the settings and I’ve set it to display 100 rows per page.
Hi @gcspoon,
Thank you for reaching out!
You can easily set the number of rows to display per page and make sure pagination is enabled by following these simple steps:
- Go to Sheet to Table > All Tables from your WordPress dashboard.
- Locate the table connected to your Google Sheet and click Edit.
- Click on the Table Customization tab.
- Under the Layout section, ensure the Show pagination checkbox is enabled (under Table bottom elements).
- Next, click on Styling from the left side menu.
- Set the Rows to show per page option to 50 (or your preferred number).
- Click Save Changes.
Please let us know if you need any further assistance!
Best regards,
Nazmul
Support TeamThank you!

You must be logged in to reply to this topic.
