GUIDE: Create custom circles on Home page
-
Current status: Working
[Updated: 11th of January 2014]Note: This Custom Circles modification will not work in conjunction with Sticky circles.
Sometimes you may want to create some circles on the Home page that aren’t posts. You may want some unique circles that link to other websites, or other bits of your site. For example you could have a circle that links to Google.
This thread provides the techniques to allow you to create these custom circles. If you like you have an image in your custom circle just like a normal circle.
Demonstration
A custom circle with the text of “Google” and no image: http://snag.gy/Y5J7e.jpg
A custom circle with the text of “Google” and an image of a frog: http://snag.gy/P252R.jpgBoth image and non-image circles are linked to Google as well.
What’s involved
This is a long tutorial and will cover the following stages:- Stage 1 – Getting started
- Stage 2 – Creating a “Content Type”
- Stage 3 – Creating a “Custom Field”
- Stage 4 – Creating another “Custom Field”
- Stage 5 – Creating a new “Custom Circle”
- Stage 6 – Coding
Please note that this tutorial will involve creating new files and updating them, so you will need FTP access. You can ask your hosting providers to help you with this.
Stage 1 – Getting started
Install this plugin: http://wordpress.org/plugins/custom-content-type-manager/Go to the “Custom Content Types” main section of the dashboard: http://snag.gy/Tp0Rg.jpg
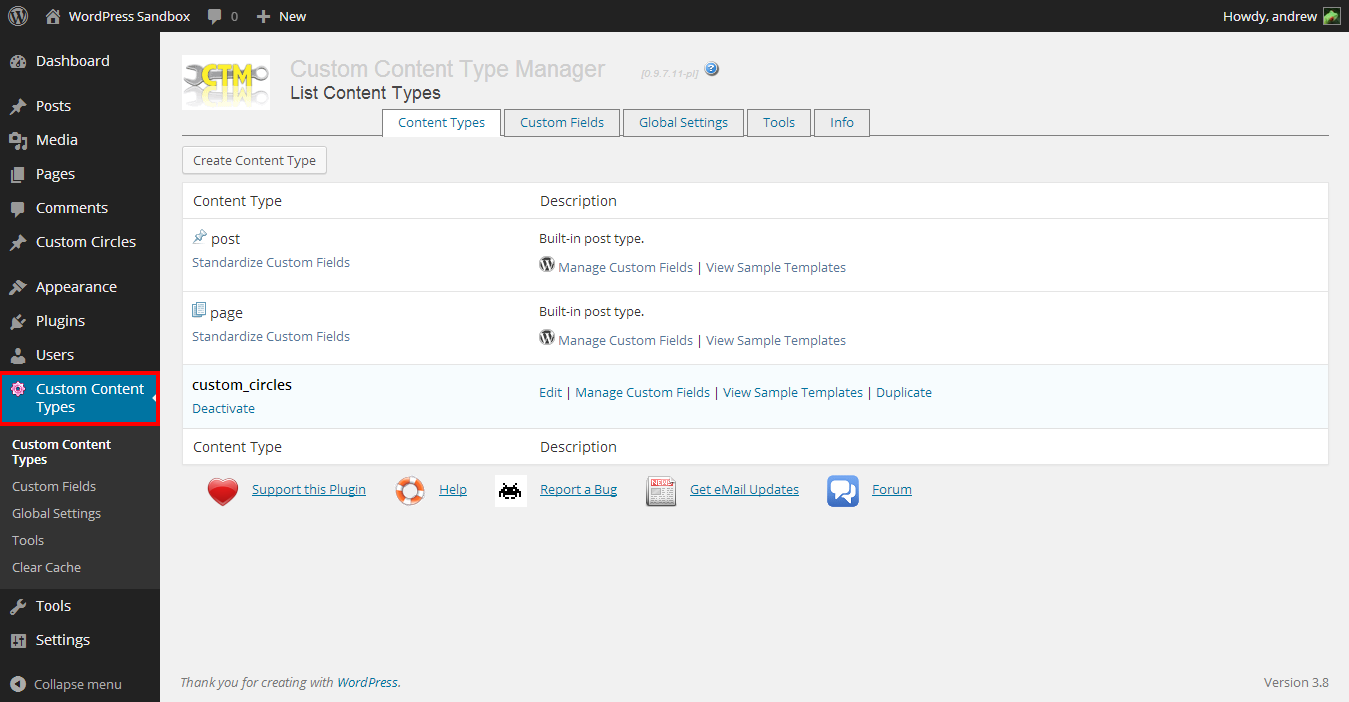
Stage 2 – Creating a “Content Type”
I’ll be demonstrating one that I created earlier.- Press the “Create Content Type” button http://snag.gy/NQ1j6.jpg
- In the “Basic” tab (it’ll be open by default) enter the following:
In “post_type” enter “custom_circles”
In “Menu Name” enter “Custom Circles”
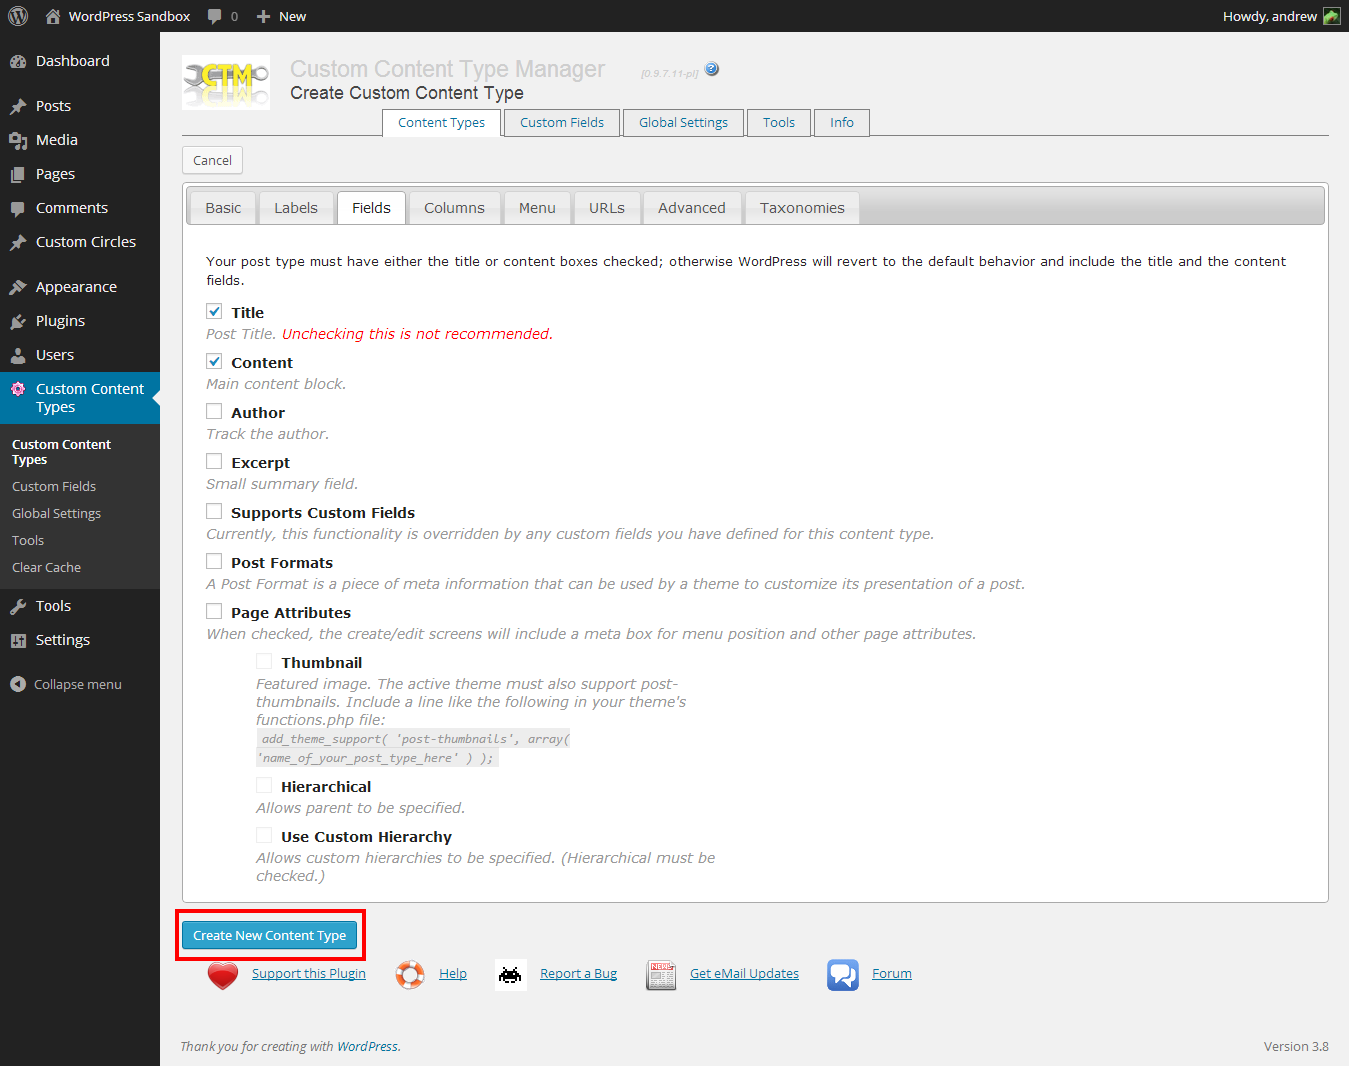
http://snag.gy/DjlKK.jpg - Then go to the “Fields” tab http://snag.gy/QSVsF.jpg
- Make sure only the “Title” and “Supports Custom Fields” checkboxes are ticked: http://snag.gy/ysQw9.jpg4
- Then press the “Create New Content Type” button http://snag.gy/LpKAW.jpg
You should then see your Custom Content Type that you just created: http://snag.gy/G3wpz.jpg
Stage 3 – Creating a “Custom Field”
This is for the link on your Custom Circle.The fields to enter in this stage are outlined in this screenshot: http://snag.gy/hSV7x.jpg
- Click on “Custom Fields” at the top of that same page in the dashboard: http://snag.gy/30H9F.jpg
- Select “Create Custom Field”: http://snag.gy/HvRr5.jpg
- Select the “Create Text” button: http://snag.gy/jaGay.jpg
- In “Label” enter “Link”
- In “Name” enter “link”
- You probably want it required too so also tick the “Required?” checkbox under “Validation“
- Make sure the “Default Output Filter” dropdown menu is set to “None (raw)” underneath “Output Filter“
- Tick the “custom_circles” checkbox underneath the “Associations” section
- Save: http://snag.gy/UUbve.jpg
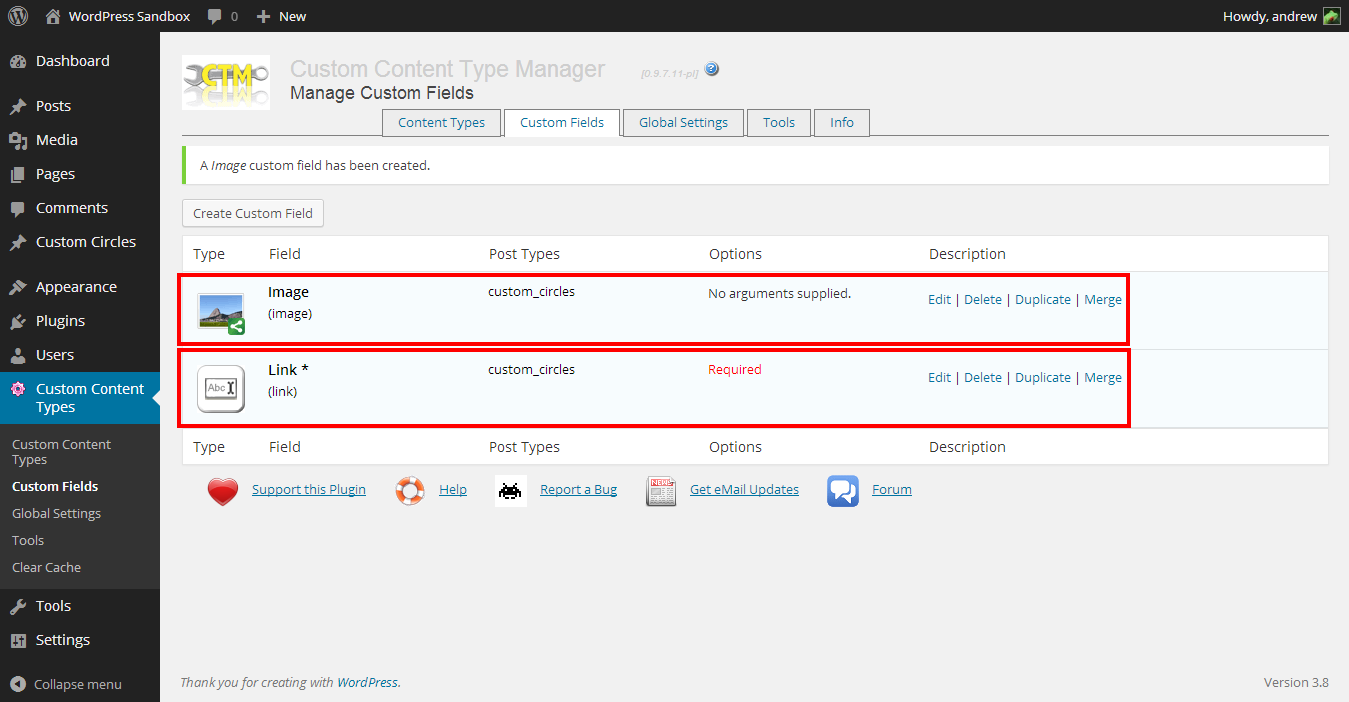
Now you should see your “Link” Custom Field created: http://snag.gy/ggo0h.jpg
Stage 4 – Creating another “Custom Field”
This is for the potential image in your circle.The fields to enter in this stage are outlined in this screenshot:
http://snag.gy/lX2Px.jpg- Click on “Create Custom Field”: http://snag.gy/oIPiP.jpg
- This time you want an image field. Select the “Create Image” button: http://snag.gy/RPk0t.jpg
- In “Label” enter “Image”
- In “Name” enter “image”
- In the “Default Output Filter” dropdown make sure “None (raw)” is selected underneath the “Output Filter” section
- Tick the “custom_circles” checkbox underneath the “Associations” section
- Save: http://snag.gy/qOtj5.jpg
So you should have both your “Image” and “Link” custom fields: http://snag.gy/rOPOJ.jpg
Stage 5 – Creating a new “Custom Circle”
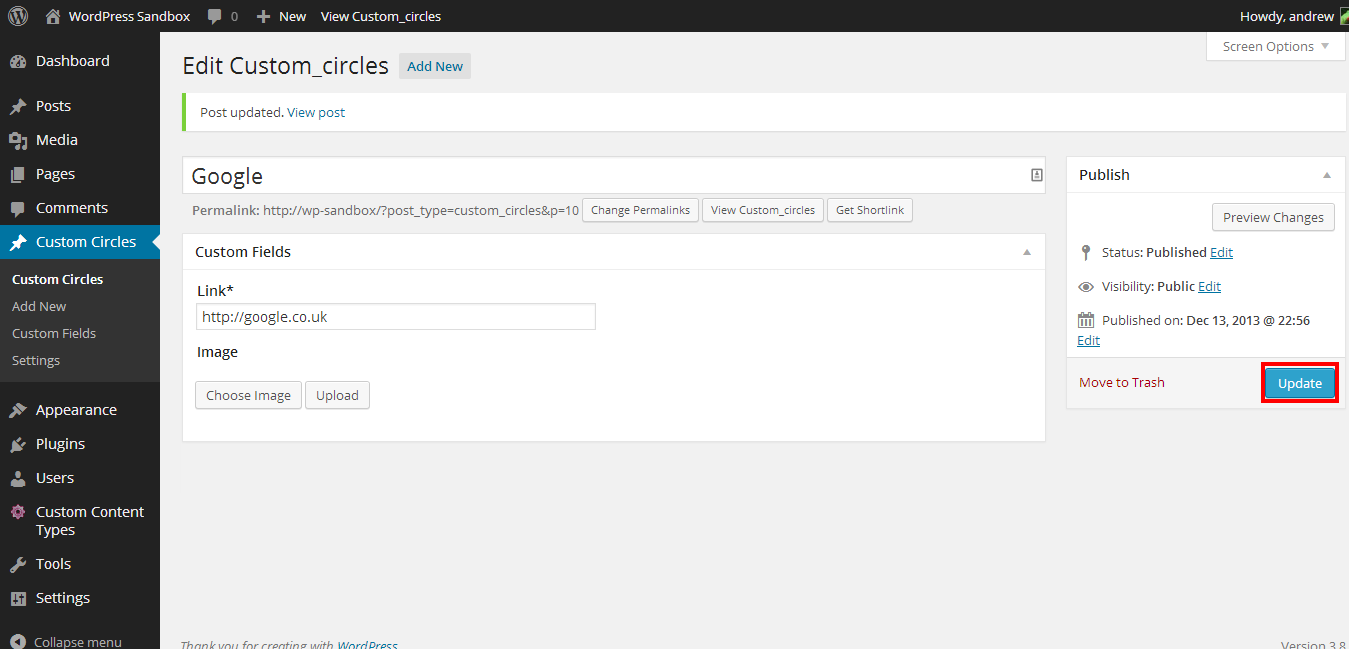
Now we’ll add the circle in the dashboard.The fields that you must enter in this stage are outlined in this screenshot:
http://snag.gy/Ljbdi.jpgNote that I’m using “Google” as an example here.
- Click on the “Custom Circles” link in your sidebar: http://snag.gy/hxyZd.jpg
- Then click “Add New”: http://snag.gy/gj7yc.jpg
- In “Enter title here” enter the text that will appear in the circle
- In “Link” enter the URL (including the “http://” bit) that you want to link to
- You can also choose an image if you want to, but you don’t have to.
- Press “Publish”: http://snag.gy/z8I6V.jpg
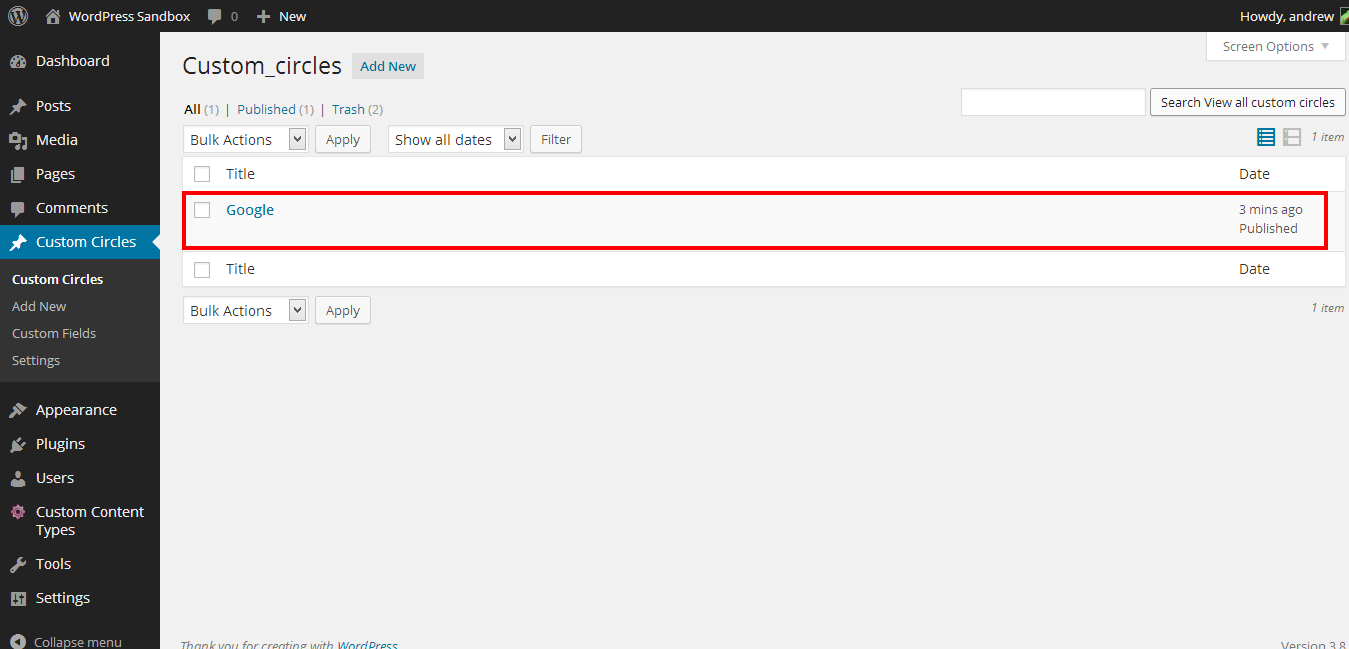
Now if you click back on the “Custom Circles” link in the sidebar: http://snag.gy/Id16z.jpg – You should be able to see the information of the circle that you’ve just made: http://snag.gy/NezIW.jpg
Stage 6 – Coding
In this section we’ll manipulate the code of the front page so that it outputs the “Custom Circles” after the regular circles.This section assumes you have a Child Theme. If you don’t have that then set one up using Codex’s instructions first: http://codex.wordpress.org/Child_Themes
- Copy the “index.php” file from the “Spun” theme and paste it into your Child Theme folder
- Edit that “index.php” file from within your Child Theme folder
- Replace all of the code in that file with the code from this PasteBin page: http://pastebin.com/UfnGhjNg
- Save the file
- Create a new file called “content-custom-circles.php” in your Child Theme directory
- Edit your “content-custom-circles.php” file and put into it all of the code from this PasteBin page: http://pastebin.com/mdiA7wiZ
Note for developers:
The code isn’t great, so if anyone wants to contribute and improve it please do. - Save the file
That should be it.
You can have as many “Custom Circles” as you like.Example 1
See an example of the result from following the steps above: http://snag.gy/Y5J7e.jpgExample 2
See an example of the result from following the steps above and using an image in the Custom Circle: http://snag.gy/P252R.jpgIf you have any issues, please create your own thread.
http://wordpress.org/support/theme/spun#postform
- The topic ‘GUIDE: Create custom circles on Home page’ is closed to new replies.
